Introduction
Amazon SageMaker is a fully managed service offered by AWS that simplifies the process of building, training, and deploying machine learning models at scale. It provides a comprehensive set of tools and features that enable data scientists and developers to create robust and high-performing machine learning solutions without the complexity of managing the underlying infrastructure.
On the other hand, Terraform is an infrastructure-as-code (IAC) tool that allows developers to define and manage their cloud infrastructure using declarative configuration files. It provides a powerful and consistent way to provision and manage resources across various cloud providers, including AWS.
While Amazon SageMaker handles the entire machine learning workflow, including model training and hosting, there are cases where you might want to deploy a pre-trained model from a different source like Hugging Face Hub to your AWS infrastructure. This is where the Sagemaker model endpoint comes into play. A Sagemaker model endpoint allows you to host your pre-trained model on AWS, making it accessible through an API endpoint, thereby enabling seamless integration with other applications and services.
The Need for Custom Deployment
In some scenarios, using the hosted version of a model from other sources like Hugging Face might not be sufficient. For instance, if you have a high volume of prediction requests, the rate limits of the hosted model’s API could become a constraint. Additionally, you may have specific customization requirements that are not possible with the hosted version.
To address these limitations and have better control over the API usage and scalability, deploying a pre-trained machine learning model on your own AWS infrastructure using Terraform is an ideal approach. By doing so, you can ensure that the model’s endpoint is fully managed and optimized within your AWS environment, allowing you to meet your unique business needs effectively.
About the Pre-trained model
The pre-trained model is from Hugging Face, it is called Finbert Tone. Finbert is a specialized BERT model that has been pre-trained on an extensive financial communication text corpus, totaling 4.9 billion tokens. Its purpose is to facilitate advanced financial Natural Language Processing (NLP) research and applications. The model has been fine-tuned on 10,000 manually annotated sentences from analyst reports, achieving exceptional performance in financial tone analysis. If you are looking to leverage NLP for financial sentiment analysis.
Use Case
In a recent project, we needed to create concise summaries for large PDF financial reports, with each section having its own summary. To achieve this, we used a powerful Large Language Model (LLM) - OpenAI’s gpt-3.5, The LLM’s ability to understand context and extract crucial information allowed us to generate informative and brief summaries for each section of the documents.
However, when it came to analyzing sentiments in the summaries, the LLM didn’t yield the desired results. So, we decided to explore other options and found the perfect fit: the Finbert tone model. This specialized model excels in sentiment analysis for financial text. By using the Finbert tone model, we obtained valuable sentiment labels and scores for the generated summaries.
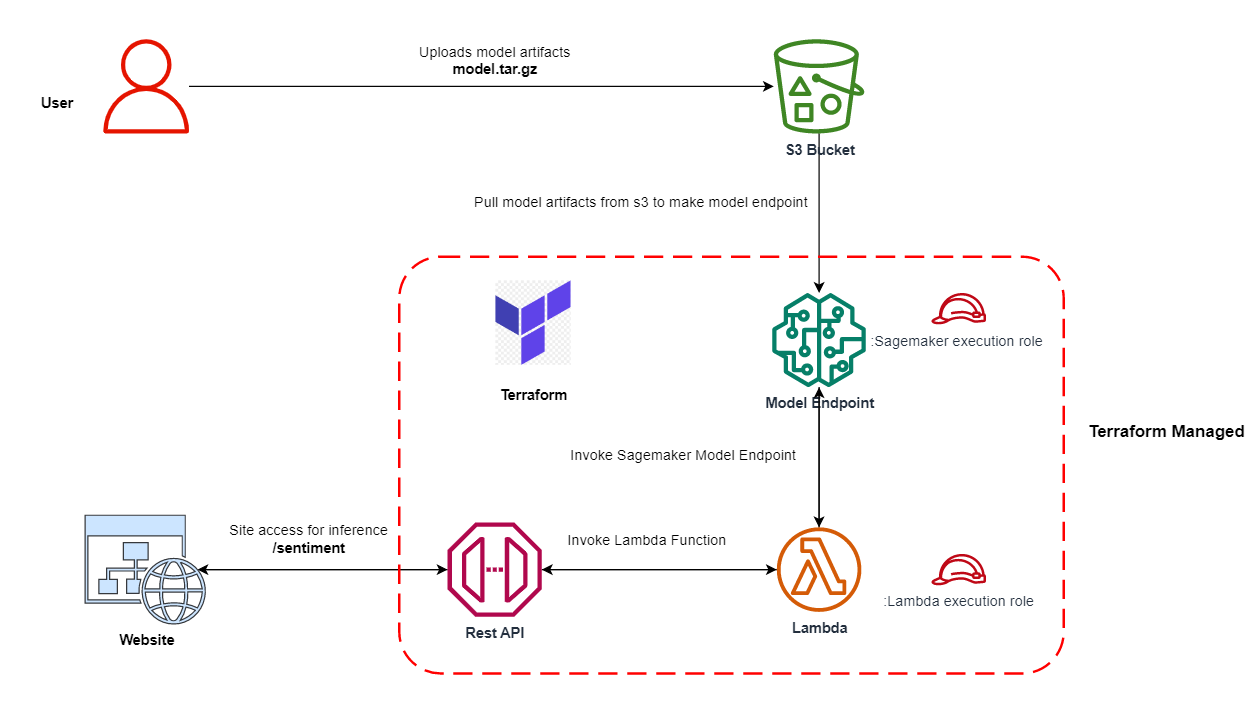
In this blog post, we will explore how to leverage the combination of Amazon SageMaker and Terraform to deploy a pre-trained machine learning model as a Sagemaker model endpoint. By using Terraform, we can define the infrastructure required for hosting the model as code, making the deployment process consistent and reproducible.
We will walk through the steps required to set up the necessary AWS resources, upload the model artifacts to S3, and create the Sagemaker model endpoint using Terraform. Additionally, we will integrate the Sagemaker endpoint with Amazon API Gateway to expose the model’s predictions through a RESTful API endpoint.
Step 0: Download the Resources
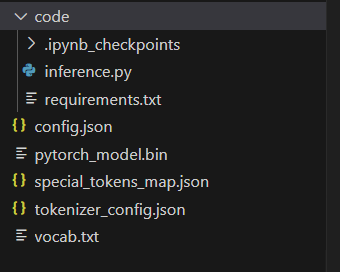
Before we begin, make sure to download the necessary resources from the repository. The model folder structure should resemble the image below:

Please note that the actual model file pytorch_model.bin is not provided in the GitHub repository due to its large size. You can download it separately from this link.
In the repository, you will find all the essential code and files required for deploying the pre-trained FinBERT model using Terraform and Amazon SageMaker. Let’s proceed with the deployment process.
Step 1: AWS Profile Setup
Before we begin, make sure you have an AWS account and the AWS CLI installed. Set up an AWS profile that Terraform will use to authenticate with your AWS account. You can do this by running the following command and entering your AWS access key ID and secret key ID:
aws configure --profile sagemaker
Step 2: Create S3 Bucket with Versioning Enabled
To store our Terraform state, we need an S3 bucket with versioning enabled. Versioning allows us to maintain historical versions of the state file, making it easier to track changes and collaborate with others.
Create S3 bucket from CLI
aws s3api create-bucket \
    --bucket sagemaker-endpoint-deploy-tf-state \
    --region ap-south-1 \
    --create-bucket-configuration LocationConstraint=ap-south-1 \
    --profile sagemaker
Enable Bucket Version
aws s3api put-bucket-versioning \
    --bucket sagemaker-endpoint-deploy-tf-state \
    --versioning-configuration Status=Enabled \
    --profile sagemaker
Step 3: Build Model Artifacts
Our Sagemaker model endpoint requires certain model artifacts, including code and model with associated configurations. The model folder from the above repository only missing actual model file pytorch_model.bin. Please download it and place in the same model directory along with the model configurations.
Once we have the necessary artifacts in the model folder, we’ll compress them into a tar file using the following command:
tar -czvf model.tar.gz -C model .
tar: The tar command.-czvf: Flags for creating a gzipped tar archive with verbose output.model.tar.gz: The name of the output archive.-C model: Change directory to the “model” directory..: Include all files and subdirectories inside the “model” directory in the archive.
Step 4: Upload Model Artifacts to S3 Bucket
With our model artifacts ready, we can now upload the model.tar.gz file to our S3 bucket. Run the following command:
aws s3 cp model.tar.gz s3://finbert-tone-poc-model/finbert-tone-model-2023-08-03/model.tar.gz --profile sagemaker
Make sure to replace the S3 bucket URL and path with your specific bucket and path. Here we used s3 key structure with timestamp to represent model version.
Step 5: Compress Lambda function for deployment
zip -r lambda.zip ./lambda/* -j
zip -r lambda.zip: It creates a zip file namedlambda.zip./lambda/*: It specify the path of the files and folders inside thelambdadirectory. The*glob pattern is used to include all files and folders inside thelambdadirectory.-j: With this option,zipwill store only the relative paths of the files, effectively flattening the folder structure inside the zip archive.
Step 6: Terraform Deployment
With our model artifacts uploaded, we can now proceed to deploy the Sagemaker model endpoint using Terraform. Before running any Terraform commands, make sure to configure the variables in the terraform.tfvars file according to your preferences, for example replace above s3 file url into sagemaker_model_data_s3_url.
Let’s initialize Terraform in our working directory:
terraform init
Next, run the Terraform plan to see the changes that will be applied:
terraform plan
Review the plan carefully before applying the changes to avoid any unintended modifications. If everything looks good, apply the changes:
terraform apply
After the deployment is successful, Terraform will provide the API Gateway URL where our Sagemaker model endpoint is accessible.
Apply complete! Resources: 16 added, 0 changed, 0 destroyed.

Outputs:

api_gateway_url = "https://k3565nbkl6.execute-api.ap-south-1.amazonaws.com/dev"
Append /sentiment to the api url for getting the sentiment for financial text. Request method will be of POST method
https://k3565nbkl6.execute-api.ap-south-1.amazonaws.com/dev/sentiment

{
    "text": "growth is strong and we have plenty of liquidity"
}

Response

{
    "data": [
        {
            "label": "POSITIVE",
            "score": 1
        }
    ]
}
terraform init- It initializes a Terraform configuration in the current directory.
- It downloads and installs the required provider plugins and modules specified in our configuration.
- It sets up the working directory and prepares it for the other Terraform commands.
terraform plan- It creates an execution plan for our infrastructure.
- It compares the desired state (specified in our Terraform configuration files) with the current state (tracked in the Terraform state file).
- The plan shows what changes Terraform will make to achieve the desired state.
- It does not make any actual changes to our infrastructure; it only shows us what changes will occur when we apply.
terraform apply- It applies the changes to our infrastructure as described in the execution plan generated by
terraform plan. - It creates, updates, or deletes resources as needed to reach the desired state.
- It interacts with us to confirm whether we want to proceed with the changes or not, based on the plan.
- It applies the changes to our infrastructure as described in the execution plan generated by
terraform destroy- It is used to destroy the infrastructure created by Terraform.
- It will delete all the resources that were previously created using
terraform apply. - Terraform will ask for confirmation before actually destroying the resources to avoid accidental deletions.
Conclusion
In this blog post, we explored how to deploy a Sagemaker model endpoint using Terraform, making the process of creating machine learning APIs easier and more manageable. By following the step-by-step guide, you learned how to set up the AWS profile, create an S3 bucket with versioning enabled, build model artifacts, upload them to S3, and finally deploy the Sagemaker model endpoint using Terraform. The ability to manage infrastructure as code provides scalability, repeatability, and consistency, enabling seamless integration of machine learning models into real-world applications.
Caution!!!
Always exercise caution when using terraform apply and terraform destroy, as they can make significant changes to your infrastructure. Review the execution plan carefully before applying any changes to understand the impact on your resources. With these best practices in mind, you can confidently deploy and manage your machine learning models with AWS Sagemaker and Terraform.
What’s Next : Adding Amazon Cognito to protect API from unauthorized access
While we have successfully deployed the Sagemaker model endpoint using Terraform and integrated it with Amazon API Gateway, we can further enhance the security and control of our machine learning APIs by implementing user authentication and authorization. Amazon Cognito is a fully managed service that provides secure user sign-up, sign-in, and access control for your web and mobile applications. By integrating Amazon Cognito with API Gateway, we can control access to the API and ensure that only authorized users can make predictions using the machine learning model.
You can find the cognito implementation on branch sagemaker-with-apigateway-and-cognito in the above repository.
